

WARNING
TV's carry extremely high voltages with enough current to kill you.
DO NOT do RGB mods to "hot chassis" CRT's.
Always power your CRT from an isolation transformer.
DO NOT attempt these modifications unless you are confident in the electrical engineering field and understand what you are doing.
I thought I would startup a log about how to modify a CRT TV to accept an RGB signal from your PlayStation 1.
Now, considering I'm in Australia, we don't have SCART on our TV's, so we have to use composite video.
This is what composite versus RGB looks like:
The goal here is to try and get a picture that is as rich, clear and sharp like this:
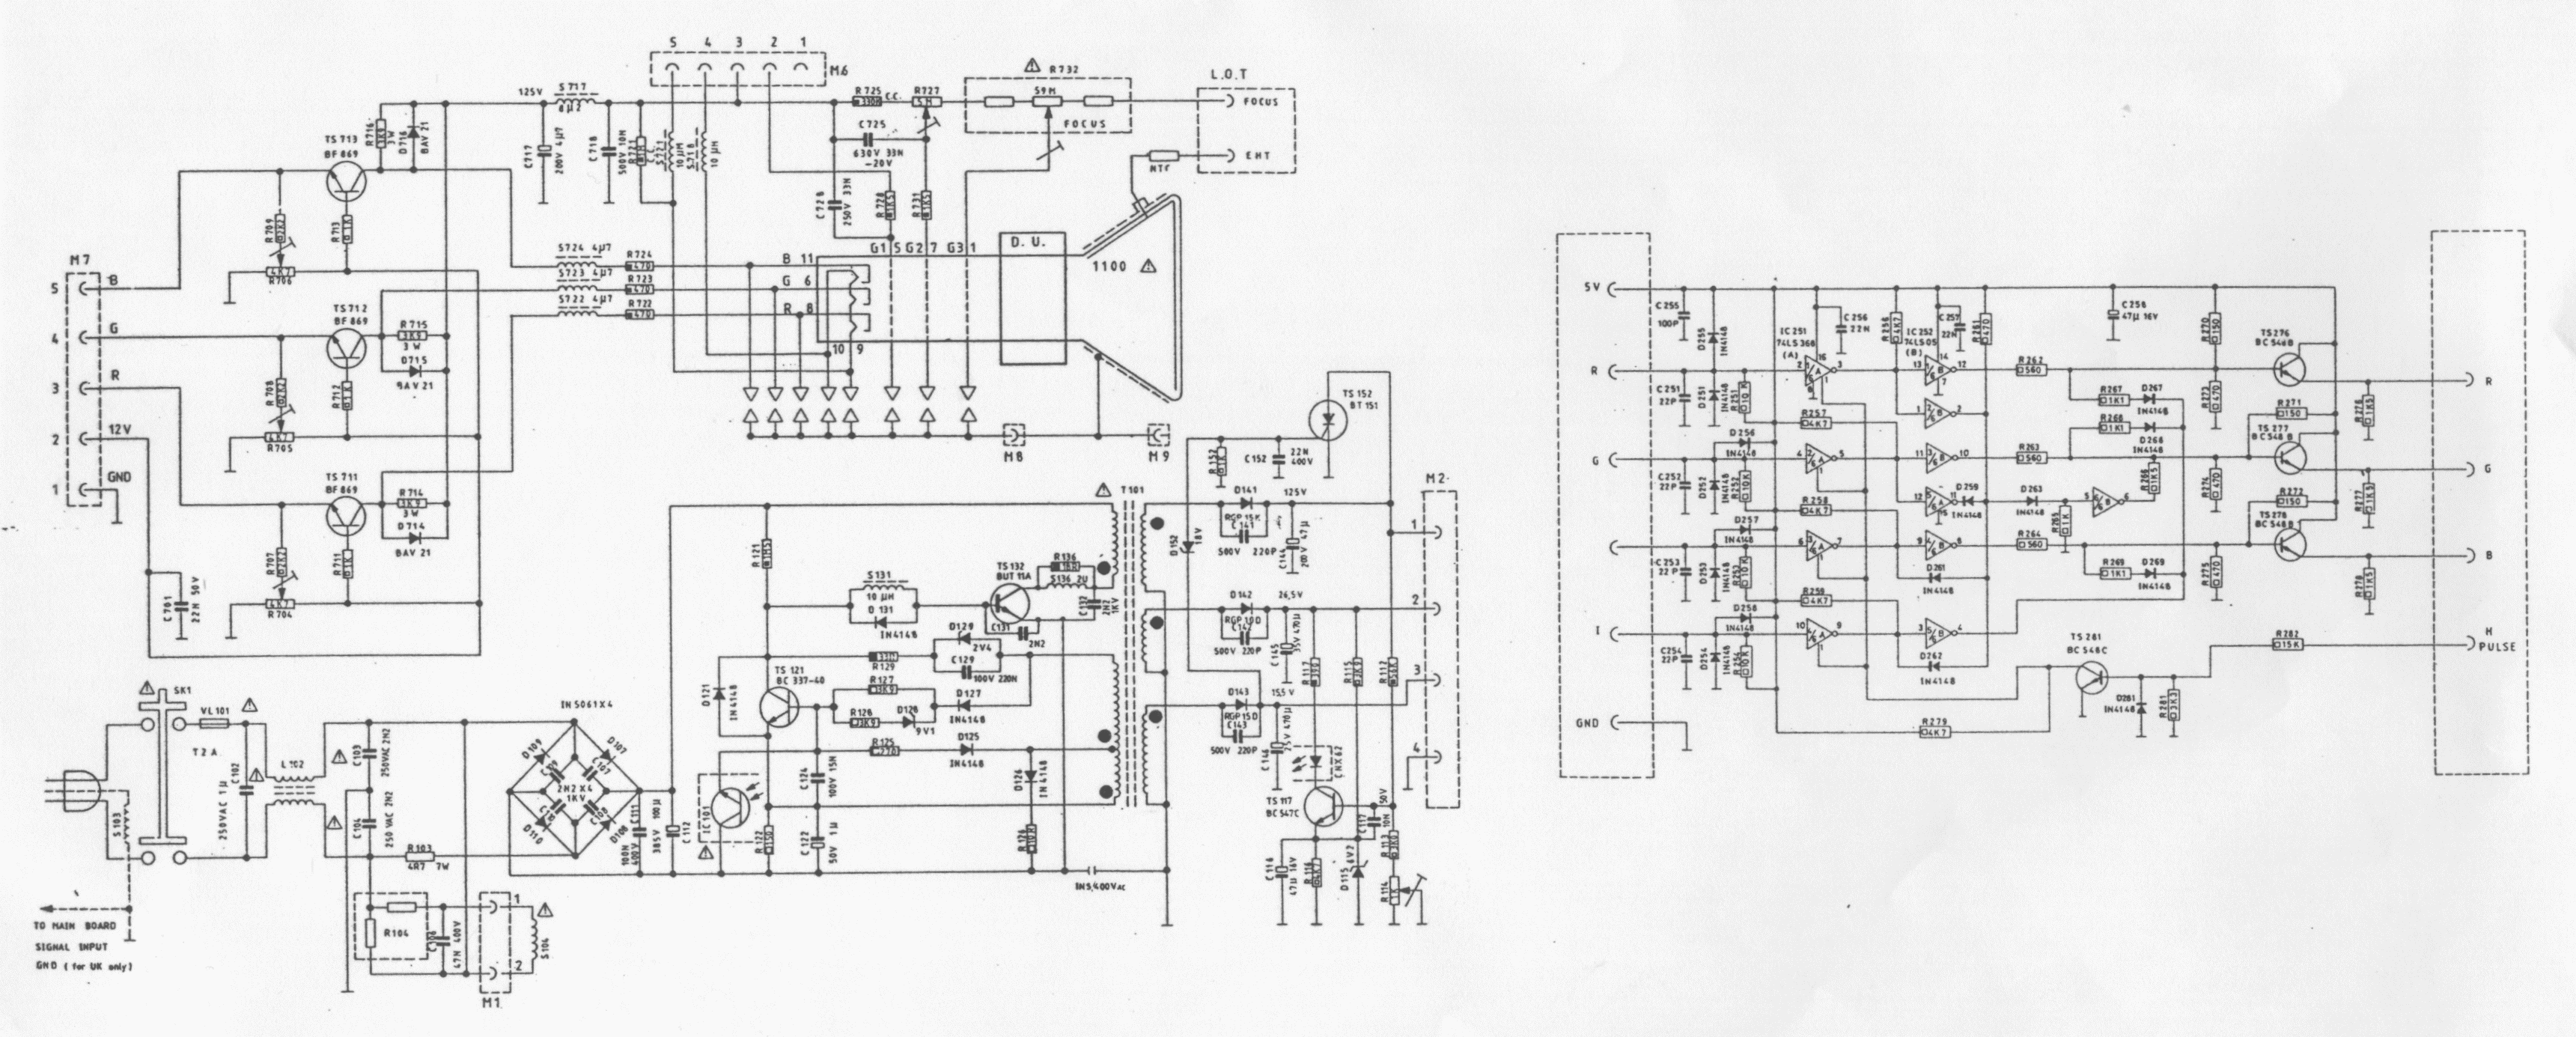
So, how do we add RGB to a CRT TV that wasn't designed to. Well, all CRT TV's have an electron gun that fires at the red, green and blue phosphors from the neck board through the shadow mask. This is how the Commodore 1084 monitors did it, and you can see that in this schematic here and here. If we cut the red, green and blue connections from the TV's mainboard and inject our own RGB voltages, say, from a PlayStation 1 (SEGA Mega Drive, Amiga, Arcade PCB, etc) and directly drive the guns, we should get a crystal clear, analog based RGB picture:
Now take in mind that whilst I have managed on my little CRT to drive the on screen display chip and force out an RGB signal from the "Jungle IC" or "On-Screen Display" (OSD), most of them use digital RGB and not analog RGB, so you wont get nice gradients. I do not consider injecting an RGB signal by this method a valid way of adding RGB to a CRT TV. It's a cheap and nasty way of doing it. This direct gun drive method involves driving the guns directly with pure analog RGB
Moving along, as a test, I re-opened my small 14" CRT 'Konka' CRT TV and found three C4544 NPN transistors. They are "Switching and Horizontal driver chroma output transistors, rated for 300V at 0.1A (8W)". If I were to inject my RGB signal into their collectors, in theory, I should get a picture from my PlayStation 1:
Before I do that however, a test was needed to know what transistor was driving each gun. So, I cut each wire and then tinned their ends. One of the main driver lines coming from the "Jungle IC" was left so that I had a voltage to feed into the guns:
The alligator clip was placed in series to one of the transistors, and behold, a red picture is rastered through the shadow mask:
The Sony BIOS screen is displayed because I am feeding composite as the image. I just as well could have instead displayed a channel with noise being displayed, but this image sufficed better. Ah hell, here you go as proof:
So, moving along, I tested the other two transistors:
Hooray! Green is rastered now. I wonder what the next colour could be...
Oh, it's blue
Now let's ensure we are actually driving RGB and not CYMK.
I tied the red and green lines together, and according to colour law as seen here:
Yes, those three lines are indeed red, green and blue because red and green makes yellow.
The camera doesn't do the colour justice, but the tube is giving a really nice yellow in real life:
And yes again. All three tied together gives us a white raster:
So let's jump into the electronics side more. As a note, the "Jungle IC" is outputting and driving the transistors at 2.50V. This is on a 14" CRT, so a larger tube in theory should run at a higher voltage. The first problem is the fact that the PlayStation outputs RGB at ~2.0V, so the pictures contrast to brightness ratio is going to be a little dim. With that in mind, an amplification circuit is going to be needed to triple the PlayStation's RGB output voltages.
For my next test, I wont be using a PlayStation, but instead a SEGA Mega Drive 2.
I already have a breakout cable for the Mega Drive 2, so it was very easy and quick to hook up to the TV's cathodes.
So here we have a Mega Drive 2 ready for the test:
Some pinouts:
Behold! A red raster driven by the Mega Drive 2!!
How about we get all three signals hooked up
Not bad, but like I said, the voltage is too low and so the contrast to brightness ratio is off, hence a dull picture. I actually measured the voltage coming from the Mega Drive 2's RGB lines, and it was 2.00V. We are only 0.50V off, and still it's pretty dull.
To see how dull it really is, the game I loaded (Columns) has a 'color test':
One thing you can always do is increase the flyback voltage slightly. It's not the best idea, but it's a quick and easy fix. The best method, is to actually have potentiometers on each RGB line (so you can fine tune each colour), and boost the levels with a transistor which I will end up doing. For now, this is what the image looks like with the flyback readjusted:
It's a lot better, but it's not perfect. It's still a little dim, and, what if I plug in my Amiga or PlayStation. If the levels are lower, the screen will dim down again. If they are higher, it's no big deal because I can lower the flyback voltage back down again, but I should not have to do that.
Here are a few more images of RGB from the Mega Drive via my Western Technologies SRAM cartridge:


 , "PlayStation",
  ,
,  , "DUALSHOCK", "Net Yaroze" and "PSone" are registered trademarks of Sony Computer Entertainment Inc.
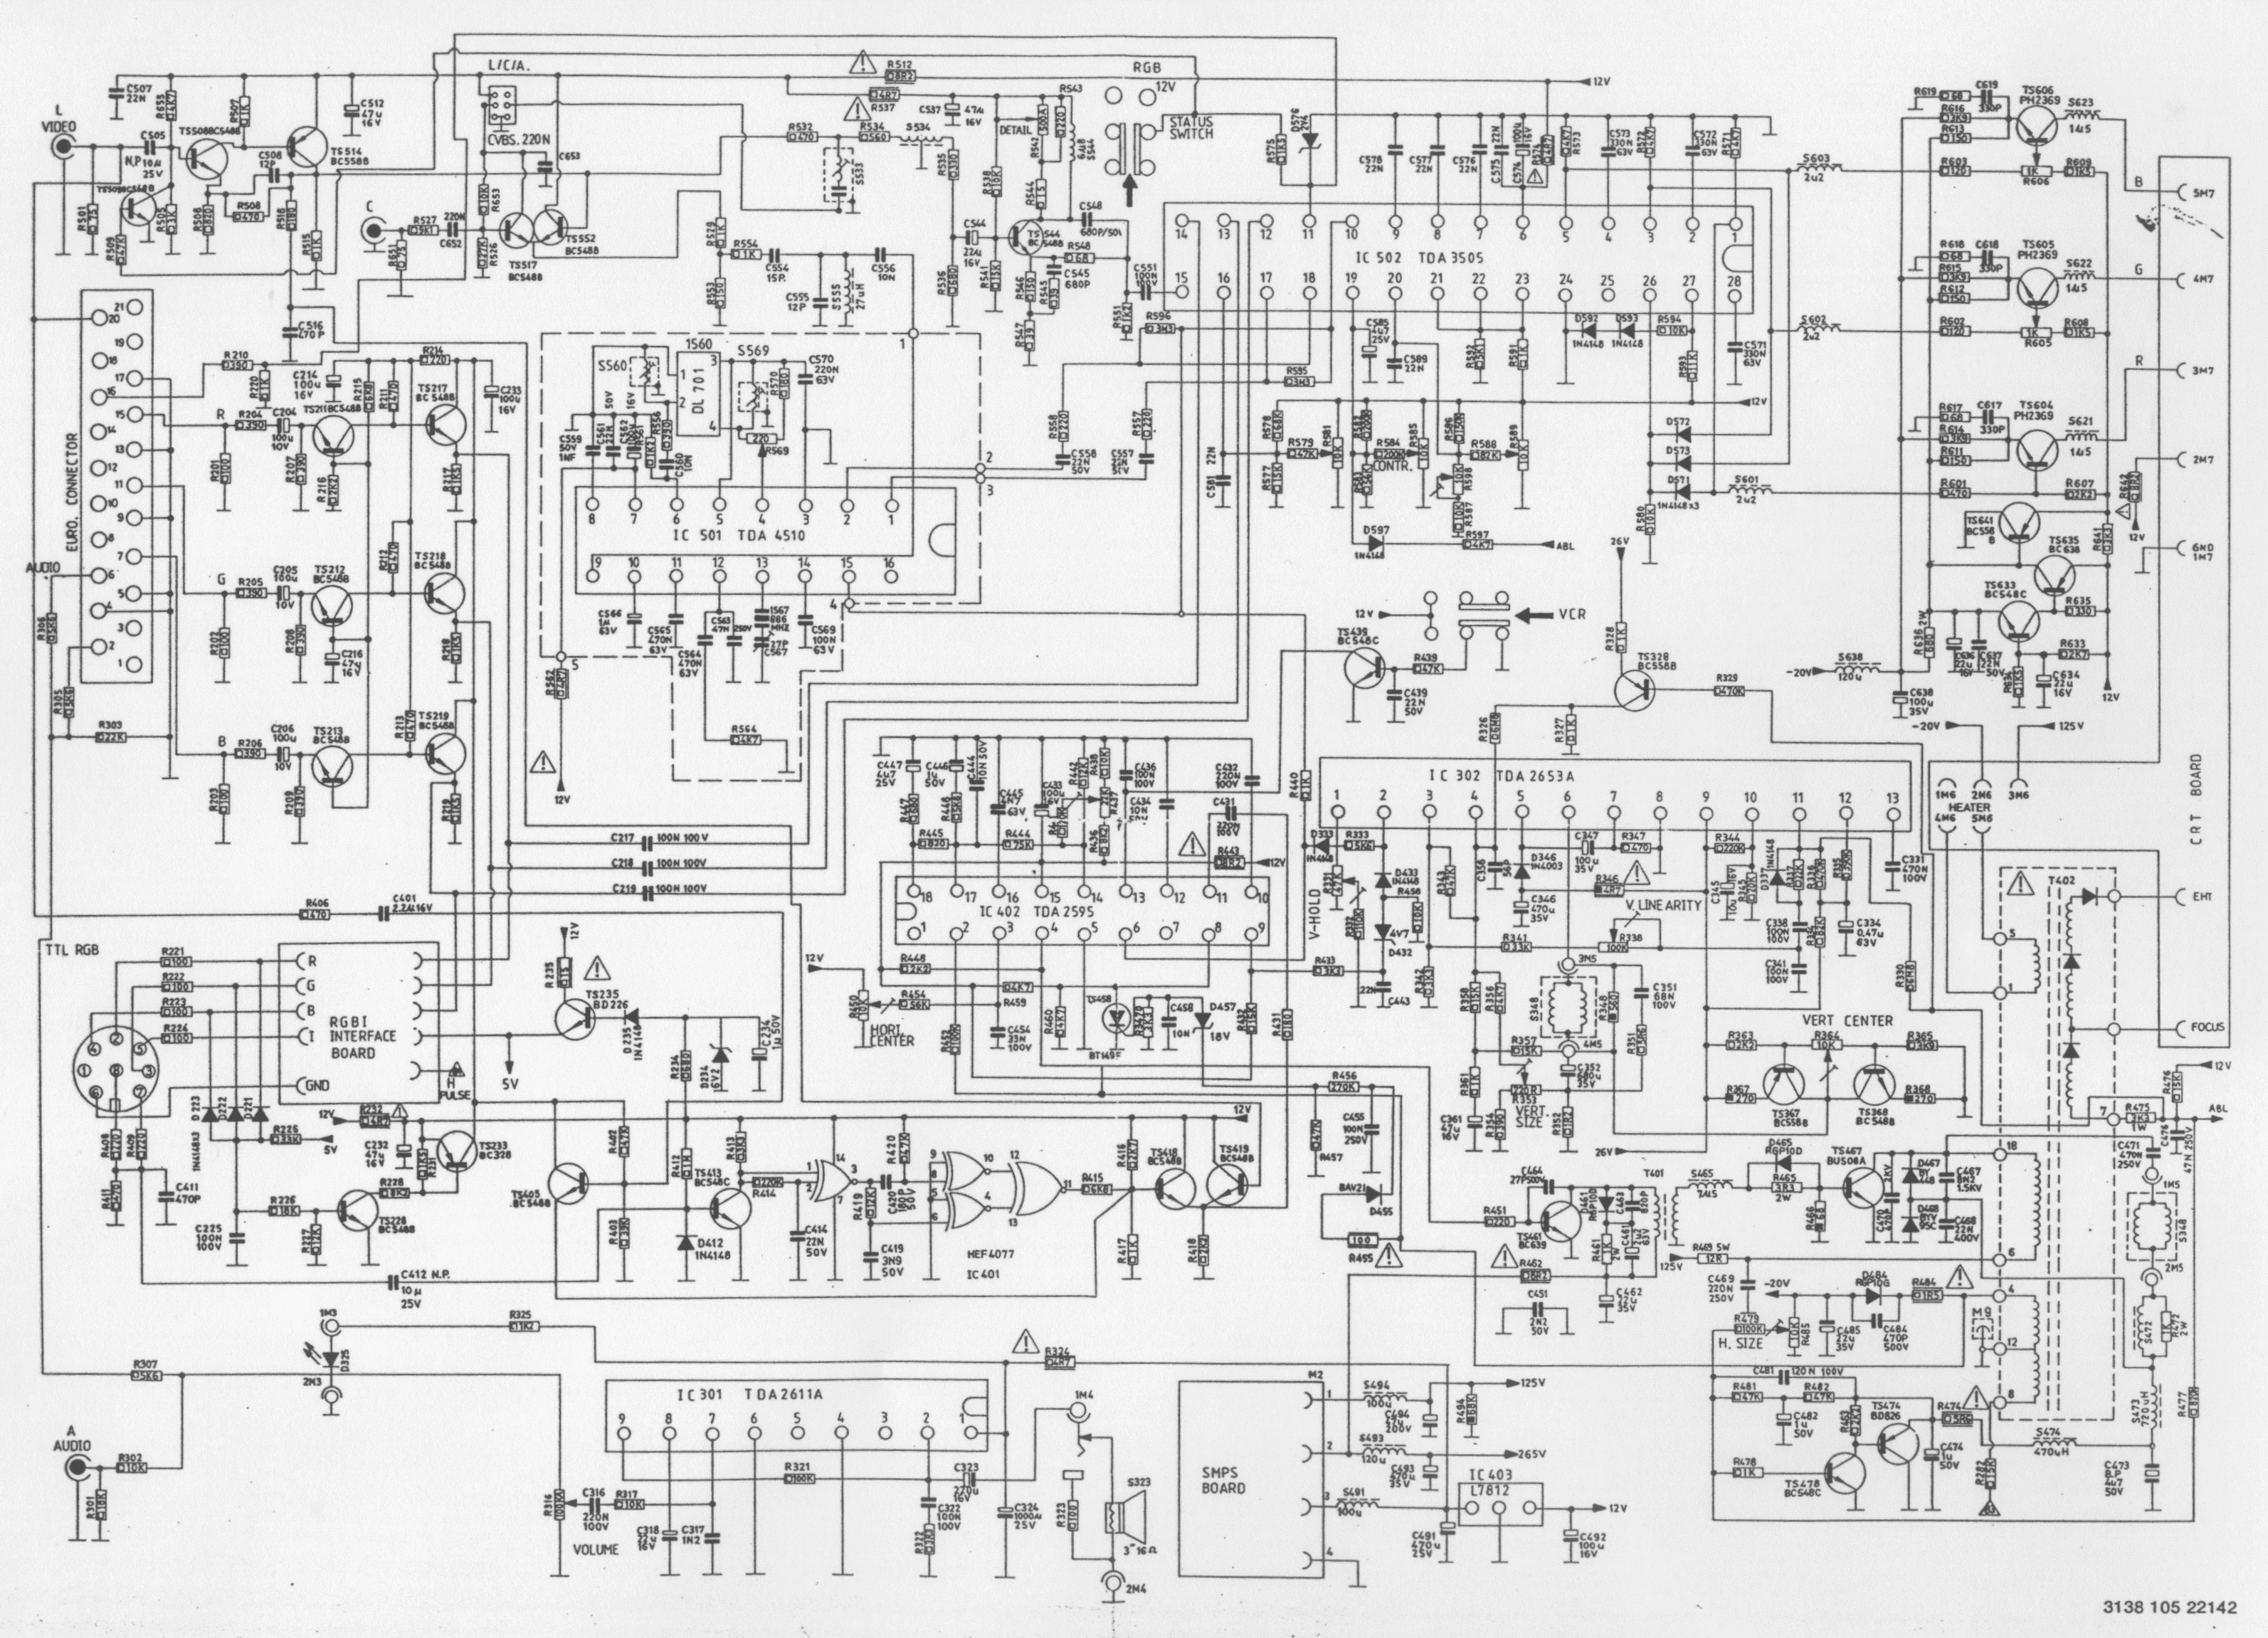